Photography: HDR for Beginners

dsc_0022_3_5_tonemappedv2

Photo taken from my recent trip to Arizona.

One of the most argued about post-processing methods of photography is the creation of HDR Photography. HDR stands for High Dynamic Range, which is a compilation of 2 or more exposure set photos taken from the same exact position creating a deep contrast in both shadows and highlights. Most “new school” photographers think this method is really cool, while many (not most) “old school” photographers think it is not real photography. Personally, I think any technique can be very cool if done correctly.

So how does one create an HDR photograph? I definitely recommend using a tripod (or any sturdy surface) and a remote. The goal is to take at least 2 shots from the same exact position so moving is not an option due to semi-long exposure times. When taking the shot, the easiest method is to set the camera in aperture priority mode and select the f stop well into the 20’s (Ex. F/22). The reason for this high of a number is to get the full range out of your camera. Once the camera has been set in place, the exposure(+/-) has to be adjusted before taking each photo. I mentioned HDR can be shot with 2 different exposure shots, but personally, I like to use at least 3 different exposure shots. In this example, take one photo at 0, one photo at +2 and the last photo at -2. Also make sure the photos are produced in RAW to create the highest quality image. When finished, export the photos on the computer.

Once on the computer I highly recommend purchasing a software program titled: Photomatix. This program is easy to use. Simply import the 3 images and run the process. After this process is complete there are many post-process options including making edits in Photoshop if needed. What initially pops out of Photomatix is most likely not the best product. To learn more about Photomatix and HDR, I highly recommend reading the Complete Guide to High Dynamic Range Digital Photography.

Categories: Tips & Tricks | Comments Off on Photography: HDR for Beginners

Photography: Starry Nights – Speaking of Long Exposures

StartrailsPhotographer Lincoln Harrison
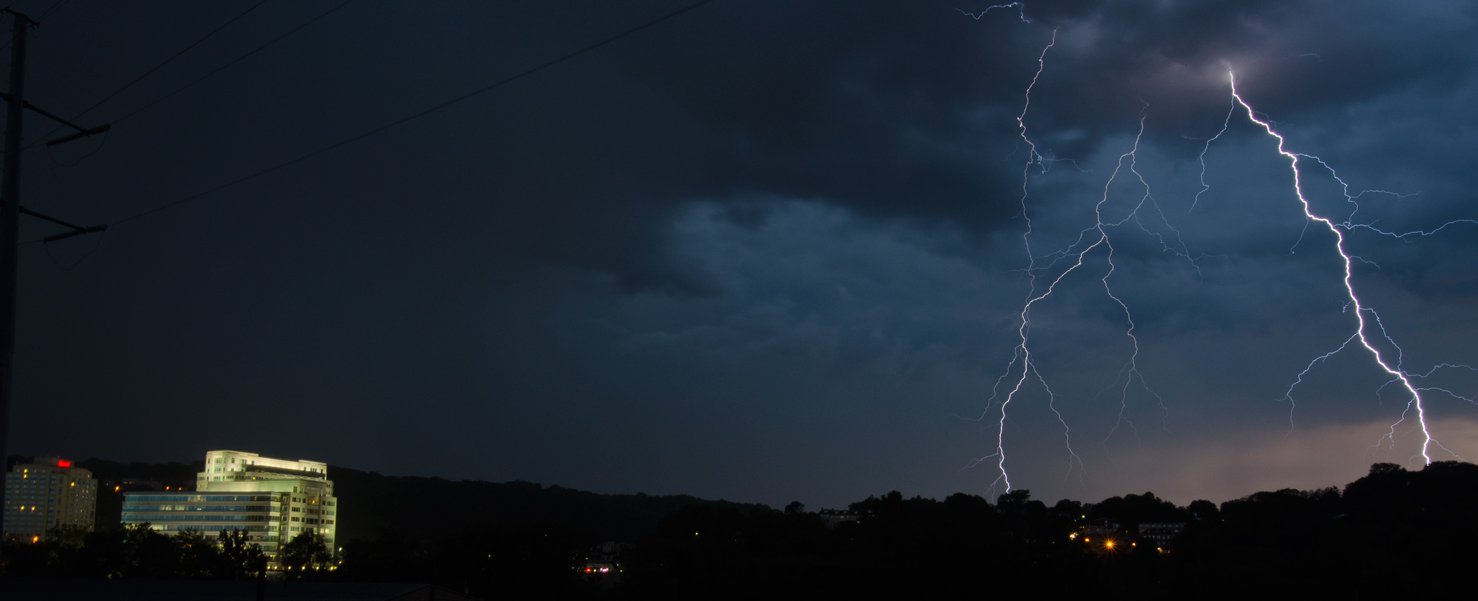
(Australia) created some amazing shots in the dead of winter. These shots were taken over a period of 15 hours from sunrise to sunset. The article does not explain the technique used, but you can tell it was done with a set timer on his camera to take a long exposure shot approximately every 30 minutes. Otherwise he was clicking the release every half hour and to pass the time he would sit outside with a warm blanket, some hot cocoa and an iPad to make sure he does not miss out on the next update from JWolfMedia.com. After he finished the extremely long shoot, he would stack the images using a stacking software or script to create a new beautiful and dramatic image. You can download this stacking software to combine these images from the link provided. Happy star trails to you!

Categories: Tips & Tricks | Comments Off on Photography: Starry Nights – Speaking of Long Exposures

Photography: Catching Lightning and Fireworks

Lightning 2“How do you shoot lightning?” I get this question a lot, and it’s one of my favorite photography techniques. Lightning, much like fireworks, is a photo technique that confuses the average viewer. They think that I would actually have to catch lightning?! This is virtually impossible because light that emits from lightning lasts on average, 0.00004 seconds. The fact that we perceive the lightning for the length of a second is just an optic illusion caused by the reaction of the eye retina.

Actually, photographing lightning is just the opposite of what most people think, which is a shot using a long exposure. A long exposure means the shutter is open for a long period of time. For the photos of lightning posted on the website, I had the shutter open for a good 6 seconds while I prayed to the thunder gods in hopes of catching an amazing shot. With any long exposure shots, a tripod is a necessary to steady the shot. I also recommend a remote so the human element is totally removed from accidentally moving the camera. This technique is also used for blurs from cars and even waterfalls. So go outside, grab your glove and catch some lighting!

Categories: Tips & Tricks | Comments Off on Photography: Catching Lightning and Fireworks

Graphic Design Section

12 Items of the Graphic Design Section has been added. Check out the Graphic Design Section. Much more to come!

Categories: Website Update | Comments Off on Graphic Design Section

Hurricane Irene

Hurricane Irene came through my home town. With some minor fear of damaging my camera equipment, I went out and shot the flooding in the area and attached a few photos just to provide a glimpse of this major disaster.

dsc_0005-1dsc_0009-1dsc_0017-1

Categories: General Comment | Comments Off on Hurricane Irene

Welcome to the NEW JWolfMedia!

Welcome to our new website.

Categories: General Comment | Comments Off on Welcome to the NEW JWolfMedia!